
Step by Step Guide to Designing a Unique Muppet with a Long Hooked-Beak
Designing your own Muppet character is an exciting and creative journey. Whether you’re inspired by the classic Muppets or want to bring something entirely new to life, the process can be deeply satisfying. This step by step guide to designing a unique Muppet with a long hooked-beak will walk you through each stage, from conceptualization to the final product. By following these steps, you’ll be able to create a Muppet that not only looks fantastic but also has its own distinct personality.
Table of Contents
- Conceptualizing Your Muppet
- Understanding the Character’s Role and Personality
- Sketching Your Initial Ideas
- Exploring Beak Shapes and Features
- Choosing Materials
- Selecting Fabrics and Textures
- Choosing Colors and Patterns
- Materials for the Beak
- Building the Body
- Constructing the Basic Shape
- Adding Limbs and Features
- Sewing and Stuffing Techniques
- Designing the Long Hooked-Beak
- Creating the Beak Structure
- Shaping and Attaching the Beak
- Adding Details to the Beak
- Bringing the Muppet to Life
- Adding Eyes and Expressions
- Creating Movable Parts
- Dressing and Styling Your Muppet
- Final Touches and Adjustments
- Testing the Muppet’s Movements
- Making Final Adjustments
- Showcasing Your Unique Muppet
- 1. Conceptualizing Your Muppet
-
Understanding the Character’s Role and Personality
- Before diving into the design process, it’s essential to have a clear idea of the Muppet’s character. Ask yourself, who is this Muppet? What is their role? Are they a mischievous trickster, a wise old sage, or perhaps a curious adventurer? Understanding the character’s personality will guide your design choices, from the shape of the beak to the colors you choose.
- The long hooked-beak is a distinctive feature, so think about how it ties into the character’s identity. Is the beak used for storytelling, for comedic effect, or does it serve a practical purpose in the Muppet’s world?
-
Sketching Your Initial Ideas
- Once you have a character in mind, start sketching your ideas. Don’t worry about making perfect drawings—this is about getting your ideas on paper. Focus on the general shape, the beak, and any other prominent features.
- Consider sketching the Muppet from different angles. Think about how the long hooked-beak will look from the front, the side, and the top. Experiment with different beak shapes and sizes to find the one that best fits your character.
-
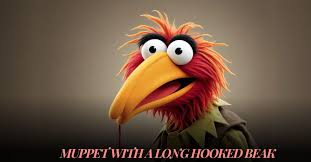
Exploring Beak Shapes and Features
- The beak is the focal point of this design, so spend time exploring different shapes and features. A long hooked-beak can vary in curvature, length, and width. Is the beak sharp and menacing, or more rounded and friendly? Does it have any special markings or textures? These details will help set your Muppet apart from others.
- 2. Choosing Materials
-
Selecting Fabrics and Textures
- With your design sketches in hand, it’s time to choose the materials. The fabric you select will play a crucial role in how your Muppet looks and feels. Consider materials like fleece, felt, or faux fur for the body. These are soft, durable, and easy to work with.
- For the beak, you might want a different texture. Consider using vinyl, leather, or a sturdy fabric that can hold the shape of the beak. The texture of the beak should contrast with the rest of the Muppet to make it stand out.
-
Choosing Colors and Patterns
- Color is another vital element in your Muppet’s design. Bright, bold colors can make your Muppet visually striking, while more subdued tones can give it a calmer, more mysterious vibe. Consider how the colors of the beak will complement or contrast with the body.
- Patterns can also add interest to your Muppet. Stripes, polka dots, or other patterns can give your Muppet a playful, whimsical look. If your Muppet is inspired by a particular animal, consider using colors and patterns that reflect that.
-
Materials for the Beak
- The beak needs to be both strong and flexible. Materials like foam, wire, and sturdy fabric are ideal. Foam can be shaped into the desired form and covered with fabric, while wire can provide structural support.
- If you want the beak to open and close, consider using a hinge or similar mechanism. This adds an extra level of interaction with your Muppet, making it more lifelike.
- 3. Building the Body
-
Constructing the Basic Shape
- Now that you have your materials, it’s time to start building. Begin with the basic shape of the Muppet’s body. This will usually be a simple, rounded form, like an oval or a sphere. Use your fabric to create the body, sewing the pieces together and leaving an opening for stuffing.
- Once the body is sewn, stuff it with a soft material like polyester fiberfill. Make sure the stuffing is evenly distributed to give the body a smooth, consistent shape.
-
Adding Limbs and Features
- Next, add the limbs and other features like ears, tails, or wings. Use your sketches as a reference to ensure everything is proportionate. Sew the limbs onto the body securely, making sure they are firmly attached.
- If your Muppet has any unique features, like horns, fins, or spikes, this is the time to add them. These elements can help emphasize the character’s personality and make them more distinctive.
-
Sewing and Stuffing Techniques
- When sewing the different parts of your Muppet, use a strong stitch to ensure everything stays in place. A backstitch or whipstitch works well for this. Be careful to hide the stitches as much as possible, especially around the visible parts of the Muppet.
- Stuffing is another critical step. Don’t overstuff, as this can make the Muppet look stiff. Instead, add just enough stuffing to give it shape while keeping it flexible.
- 4. Designing the Long Hooked-Beak
-
Creating the Beak Structure
- The beak is the most crucial part of your Muppet’s design. Start by creating a basic structure using foam or wire. This structure will give the beak its shape and allow you to control its movement if desired.
- Cut the foam or bend the wire into the desired shape, making sure the hook is prominent. If using foam, carve it carefully to achieve the right curvature. If using wire, ensure it is well-supported and covered with padding to avoid sharp edges.
-
Shaping and Attaching the Beak
- Once the structure is complete, cover it with the chosen material. This could be fabric, leather, or another durable material. Stretch the material over the structure and sew it in place, making sure there are no wrinkles or loose areas.
- Attach the beak to the Muppet’s face securely. If the beak is meant to open and close, ensure that it is hinged correctly and can move smoothly. You may need to add some additional support inside the head to hold the beak in place.
-
Adding Details to the Beak
- The details are what will make your beak unique. Consider adding textures, like ridges or scales, to the surface. You can use fabric paint, embroidery, or glued-on pieces of fabric to create these effects.
- You might also want to add nostrils, markings, or even a tongue inside the beak. These small touches can bring a lot of personality to your Muppet and make it stand out.
- 5. Bringing the Muppet to Life
-
Adding Eyes and Expressions
- The eyes are often the most expressive part of a Muppet, so take your time with this step. You can use buttons, beads, or custom-made eyes from plastic or glass. Consider the placement and size carefully, as this will affect how the Muppet’s expressions are perceived.
- Position the eyes to give your Muppet the desired expression—whether it’s wide-eyed and innocent or sly and mischievous. You can also add eyebrows, eyelids, or lashes to enhance the expression.
-
Creating Movable Parts
- If you want your Muppet to have movable parts, now is the time to add them. This could include movable arms, legs, or even an opening and closing beak. Use simple mechanisms like hinges, elastic bands, or puppet rods to achieve this.
- Movable parts add an extra layer of interaction with your Muppet, making it more engaging for both you and your audience.
-
Dressing and Styling Your Muppet
- Once the body and face are complete, consider adding clothing or accessories. This could be a hat, scarf, or even a full outfit. Clothing can help define the character’s personality and role.
- Choose fabrics that complement the Muppet’s colors and overall design. You might also want to add props, like a cane, glasses, or a musical instrument, to enhance the character’s identity.
- 6. Final Touches and Adjustments
-
Testing the Muppet’s Movements
- With your Muppet fully assembled, it’s time to test its movements. Make sure the beak opens and closes smoothly, the limbs move freely, and any other movable parts function correctly. Adjust the stuffing if necessary to ensure the Muppet holds its shape during movement.
- Practice using the Muppet as you would in a performance, paying attention to how it moves and responds. This will help you identify any areas that need tweaking.
-
Making Final Adjustments
- After testing, make any final adjustments to the design. This could include tightening stitches, adding more details, or reshaping parts of the Muppet. Take your time with these adjustments to ensure everything is perfect.
-